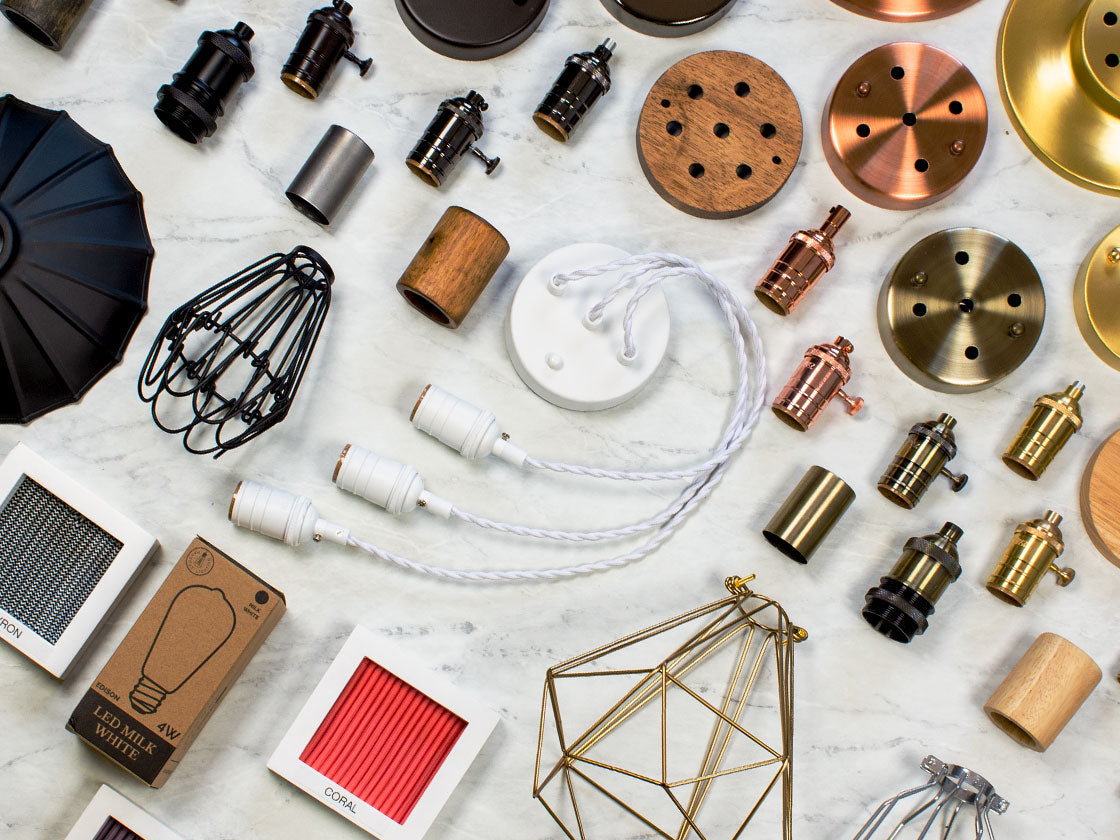
If you’ve ever searched for DIY light fixtures, light fixture design or wondered how to design a light fixture, you may have run into tutorials about tools, wiring and fabrication. However, "designing your own fixture” means planning the layout, form, placement and style, rather than wiring or fabrication.
This guide walks you through the creative, visual process behind a custom fixture: sketching your idea, choosing the “form,” deciding pendant count and placement, planning lengths and translating inspiration photos into real configurations.
Whether you want to design your own light fixture, plan a unique cluster, create a swag layout for an off-center junction box, build a linear fixture for your kitchen island or create custom lighting for a hotel, this guide gives you the design-thinking tools to do it confidently.
1. Start With Where the Light Will Go
Every great lighting design starts with the space itself. Before thinking about pendants, shades or finishes, you need to understand exactly where the fixture will live and how it needs to perform.
Find the Junction Box (or Decide If You’ll Swag)
The junction box is the most important and most overlooked part of planning a fixture. It determines the anchor point of your design.
-
If the junction box is centered, it naturally supports symmetrical layouts such as linear pendants above an island, a centered chandelier or a cluster over a dining table. Centered junction boxes give you freedom to design balanced, streamlined fixtures without needing additional adjustments.
-
If the junction box is off-center, a swag becomes essential. A simple hook allows you to reposition your fixture exactly where you want the light to fall, so a misplaced ceiling box never limits your layout. Swags work beautifully with both cords or chains and are one of Hangout Lighting’s most flexible design tools.
-
If there is no junction box at all, renters can rely on plug-in pendants paired with ceiling or wall hooks. This creates a clean, purposeful look without any electrical work, making plug-in pendants one of the easiest ways to achieve a designer-level lighting plan in apartments or older homes.
Different spaces benefit from different placements. Kitchens, dining tables, islands, bedsides, stairwells and reading corners all require thoughtful alignment between the junction box, the furniture below and the desired lighting mood.
Understand the Purpose of the Fixture
Before designing the form, decide what the fixture needs to accomplish.
-
Ambient lighting brightens the entire room and sets a general mood. This often calls for larger pendants, clusters or multiple lights spread evenly.
-
Task lighting focuses light on a surface such as a kitchen island, desk or vanity. These fixtures often sit lower and use fewer pendants to create clarity and direction.
-
Decorative lighting is more about atmosphere and visual impact than brightness. Clusters, sculptural swags and oversized globes work beautifully for this purpose, turning the fixture into a focal point.
Understanding whether your fixture is meant to illuminate, accentuate or decorate will shape every decision that follows, from pendant count to drop length to shade choice.
2. Choose Your Fixture “Form” (This Is the Fun Part)
A fixture’s “form” refers to the overall shape and arrangement of its pendants. Choosing the form is the most creative and defining step in light fixture design. The system we use at Hangout Lighting supports every major form used by designers today, allowing you to design your own light fixture without touching any wiring. Below are the core forms to consider, each with its own strengths and ideal use cases.
Single Pendant
A single pendant light fixture is clean, timeless and endlessly adaptable. It works beautifully over kitchen sinks, bedsides, vanities and small dining tables. Because it only uses one light, it creates a subtle yet intentional point of focus.
Single pendants are also ideal if you’re exploring DIY hanging light fixtures, because the simplicity of one drop allows the details, such as shade choice, cord color or chain style, to shine. Whether you prefer exposed bulbs or decorative glass shades, a single pendant offers complete flexibility without overwhelming a space.

Multi-Pendant Linear (3–7 Lights)
Linear layouts are classic for kitchen islands and long dining tables. This form creates rhythm and flow by spacing multiple pendants evenly in a row, allowing each light to illuminate a specific zone of the surface below.
Designers often choose linear fixtures because they visually elongate the room and provide consistent lighting across an entire workspace. Whether you use cords for a relaxed feel or chains for more architectural structure, linear fixtures are ideal for achieving professional-looking, intentional lighting without complexity.

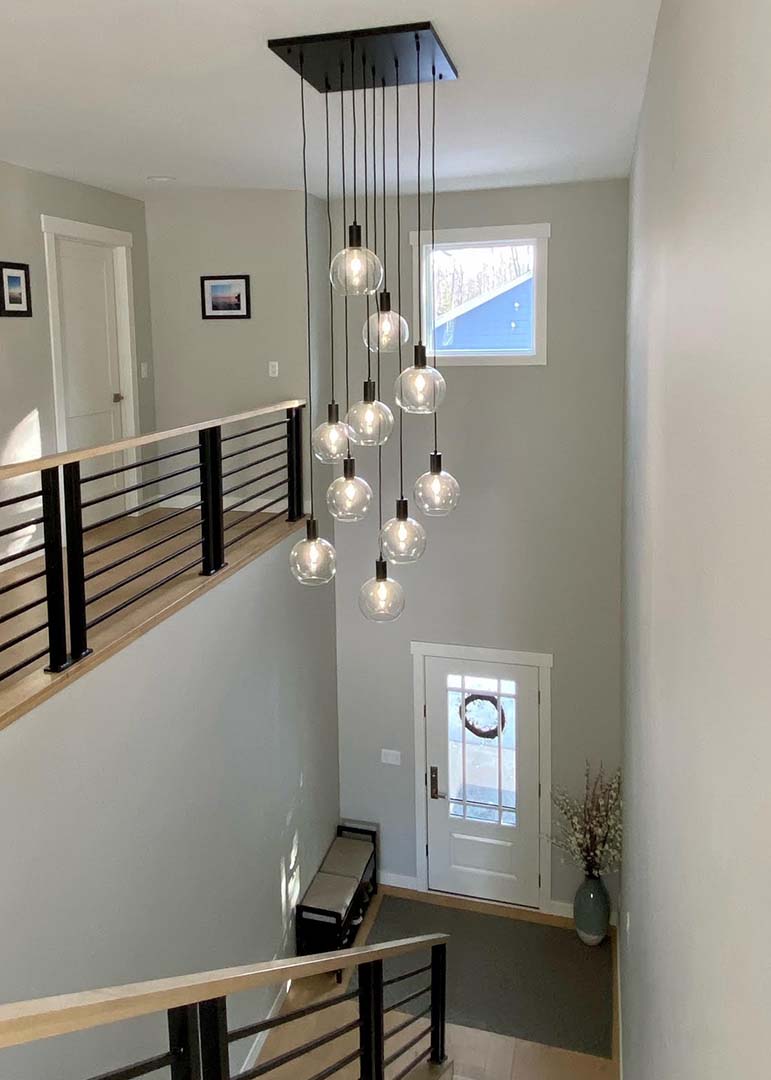
Cluster (Different Lengths, Gathered Together)
Cluster light fixtures gather pendants at different lengths to create height, drama and sculptural movement. They are perfect for tall stairwells, high ceilings, entryways and corners where a traditional fixture might feel flat or undersized.
Clusters give you the freedom to mix globe sizes, add shades or keep everything uniform for a polished look. This form is one of the easiest ways to create cool DIY light fixtures that feel artistic and custom, without needing any fabrication.

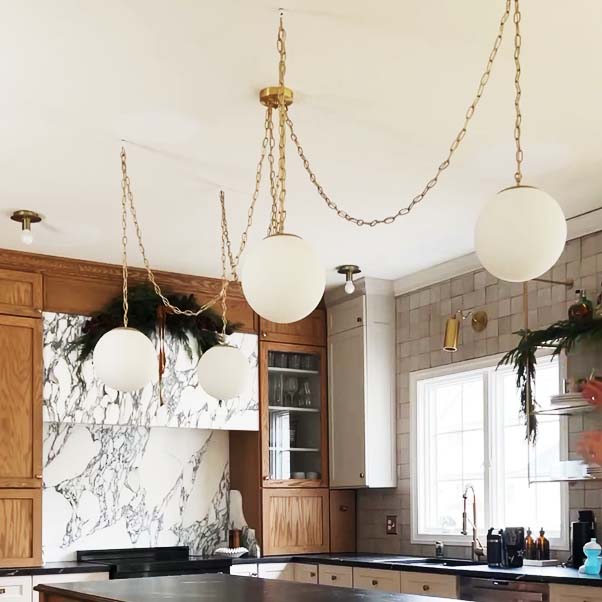
Swag Layouts (Cord or Chain)
Swag layouts are one of Hangout Lighting’s signatures. A swag chandelier allows you to move a pendant or group of pendants anywhere in the room, creating asymmetry, playful patterns or intentionally offset designs.
This approach works wonderfully when the junction box doesn’t line up with your table, bed or reading nook. It’s also ideal for renters who want dramatic overhead lighting without electrical renovations. Whether you prefer a soft drape, a zig-zag path or a scattered arrangement, a swag layout gives you complete spatial freedom.

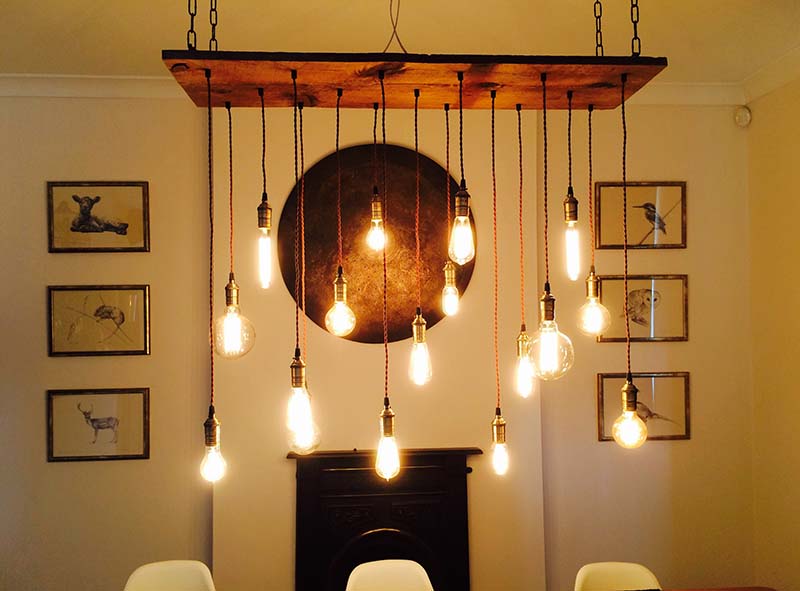
Beam or Pipe Linear Fixtures
Beam or pipe structures create a strong architectural line in the space. They work exceptionally well in large kitchens, long dining rooms and homes with high ceilings where smaller fixtures would feel lost.
Because the beam supports multiple drops, it keeps the design visually cohesive while still giving you flexibility to choose cord, chain, globe size and shade style. A wrap around light fixture is favored by interior designers because it blends structure with customization, making it an excellent option for bold, large-scale lighting concepts.

3. Create a Quick Sketch (Or Use an Inspiration Photo)
Sketching is one of the most powerful design tools you can use, even if you “can’t draw.” A simple sketch helps you visualize your idea, understand scale and identify how many pendants you need before you begin using the configurator.
Napkin Sketch Method
Start with a basic ceiling outline, then add the key elements:
-
Draw the ceiling shape, such as a square, rectangle, hallway or tall open area. This helps you understand the proportions of the room and how the fixture might fill the space.
-
Mark the junction box, since this determines your anchor point. Knowing whether it is centered or off-center guides the fixture form you’ll choose.
-
Add the surface below, such as a table, island, bed or landing. This makes it easier to align pendants with the furniture for visual balance.
-
Place each pendant, indicating where you want the lights to fall. This establishes the basic layout and spacing.
-
Add approximate drop lengths, especially if staggering them. Length decisions influence the mood and visual flow.
-
Note globe or shade sizes, even roughly. This helps you avoid oversized or undersized proportions when you begin configuring.
This simple sketch becomes the foundation of your light fixture design and makes it easier to plan a custom light fixture design that feels intentional rather than improvised.
Translate an Inspiration Photo
If you’ve saved a photo from Instagram or Pinterest, break it down visually:
-
Identify the form (linear, cluster, swag).
-
Count the pendants to match the density.
-
Estimate the spacing between each drop.
-
Choose similar globe sizes depending on whether the picture looks light and airy or bold and sculptural.
-
Decide if you want shades or exposed bulbs, based on the aesthetic in the photo.
By analyzing the image, you can create your own version using our configurator, capturing the look you love while tailoring it to your actual room dimensions.
When To Use Our Configurator vs. Pre-Built Pages
Use the configurator when you want full control over every detail, from cord type and finish to pendant count and globe size.
Use pre-built product pages when you want a curated starting point with recommended proportions and layouts already built in.
4. Decide the Number of Pendants (and Why It Matters)
The number of pendants determines not just brightness, but also visual weight, symmetry and overall balance in the room.
One-Light Fixtures
A single pendant creates a simple, minimalist look that works beautifully for small spaces or focused task lighting. It provides clarity and direction without overwhelming the design.
Three to Five Lights
Medium pendant counts work best for islands, dining tables, living rooms and bedrooms. This range offers enough illumination to feel functional while maintaining a balanced, evenly spaced appearance.
Seven to Nine Lights
Larger groups make a strong statement in stairwells, high ceilings and wide open rooms. They create a soft, diffused glow while adding sculptural presence.
Ten Lights or More
High-count clusters deliver maximum impact. These fixtures become architectural elements that fill vertical space and draw the eye upward, making them ideal for dramatic entries or tall voids.
Tip: In general, odd numbers feel more natural to the eye, more pendants create softer, distributed light and fewer pendants result in more focused illumination. Using larger globes, such as 10–14 inch sizes, can reduce pendant count while preserving visual impact.
5. Choose Cord, Chain or Shades
(Good → Better → Best)
This step shapes the overall personality of the fixture.
Good: Regular Cord Swags
Cords offer the most flexible and affordable option. They create an airy and relaxed look while working beautifully with exposed bulbs or globe pendants. They are also renter-friendly, especially when used with plug-in layouts or swags.
Better: Chain
Chains add structure, weight and a more finished aesthetic. They work especially well with larger globes, since the chain visually anchors the size and adds a designer-level sense of proportion.
Best: Shades
Shades, whether glass, metal or faux alabaster, transform a pendant into a more refined, elevated fixture. They soften glare, add sculptural detail and bring a sense of luxury without the price of a full custom chandelier. Shades are one of the most effective ways to take a design from casual to high-end.
6. Plan Pendant Lengths and Spacing
Length and spacing decisions determine whether your fixture feels balanced, comfortable and well-scaled. When planning, consider ceiling height, table or island width, head clearance and the overall scale of the room. Level pendants create order and symmetry, while staggered lengths introduce movement and drama. Below are helpful rules of thumb:
-
Kitchen island pendants typically hang 28–36 inches above the countertop, giving you both functional lighting and visual breathing room. This height prevents shadows while keeping the lights low enough to define the workspace.
-
Dining table fixtures usually sit 30–36 inches above the table, depending on ceiling height and pendant size. Lower placement feels intimate, while higher placement feels airy and open.
-
Stairwell fixtures often look best with staggered drops, which emphasize the vertical nature of the space. This approach also prevents the fixture from feeling lost in a tall void.
-
Bedside pendants should hang low enough to soften glare and create a warm glow. This is especially helpful in rooms where you want lighting that feels calming rather than clinical.
7. Finalize Your Design Using Hangout Lighting’s Tools
Our configurator at Hangout Lighting allows you to transform your concept into a real fixture with ease.
Use the Configurator to Try Different Layouts
Inside the builder, you can experiment with your layout by adjusting pendant count, moving between cord and chain, adding shades and swapping globe sizes. This step feels like shaping a real design. It allows you to see how each choice affects the overall form and balance. This is where the principles of fixture manufacturing meet your creative vision, without requiring any construction knowledge.
Send Your Sketch to Our Team (If You Want Help)
If you want expert confirmation, you can send your sketch or inspiration photo to our Hangout Lighting team. Our designers will help refine the proportions, check feasibility and translate your ideas into a beautifully scaled fixture.
Order With Confidence
Your custom fixture arrives assembled and ready for installation. There is no need for wiring, fabrication or DIY tools. Your electrician handles the mounting, and your design vision comes to life exactly as you planned.
Frequently Asked Questions
How to create a custom fixture?
To create a custom fixture with Hangout Lighting, begin by planning the concept rather than building anything. Start by identifying where the light will go, understanding the purpose of the fixture and choosing a fixture form (such as a single pendant, linear arrangement, cluster, swag layout or beam).
From there, create a quick sketch or use an inspiration photo to map out pendant placement, drop lengths and approximate scale. Once your idea feels clear, use Hangout Lighting’s configurator to adjust pendant count, cords, shades, globe sizes and spacing until the design matches your vision.
Can you DIY light fittings?
You can design your own fixture, but not in the sense of building or wiring one yourself. Your role is the design-planning: deciding layout, form, pendant count, style and placement.
If you're a renter or prefer non-hardwired solutions, you can use plug-in pendants with hooks to create a custom look without electrical work.
How do you choose the right fixture size for your room?
The best way to choose the correct fixture size is to think about scale in relation to the room and the furniture below it. Larger rooms or tall ceilings generally need bigger globes, longer drops or multi-pendant layouts to feel balanced. Smaller rooms benefit from single pendants or compact clusters that don’t overwhelm the space. For specific information, visit our pendant size guide.
What if your junction box is off-center?
An off-center junction box is easy to work around. Simply use a swag to relocate the visual center of your fixture. By adding a hook in the ceiling, you can drape the cord or chain to position the pendant exactly above your table, island, bedside or reading nook. This allows your fixture design to look intentional and balanced, even if the original junction box placement is not.
Can you mix cord and chain in the same fixture?
Yes, you can mix cord and chain within the same design. Combining materials is a subtle way to add dimension, contrast and a more “designer” look. Chains add structure and weight, while cords feel lighter and more relaxed. A mixed-material approach works especially well in multi-pendant linear fixtures or clusters where each drop can play a slightly different visual role.
How do you choose globe size?
Globe size affects both proportion and personality. Larger globes (10 to 14 inches) create a bold, sculptural statement and can reduce the number of pendants needed. Smaller globes feel airier and work well in tighter spaces or in clusters with many pendants.
How do you design for high ceilings?
Designing for high ceilings means embracing vertical space. Long drops, clusters and beam or pipe fixtures help fill the height and prevent the fixture from feeling lost. Staggered pendants add movement and help draw the eye upward, while oversized globes or shades add presence from below. In tall entries, stairwells and vaulted rooms, the most successful fixtures are those that visually connect the lower and upper parts of the space through layered or elongated forms.


Share: